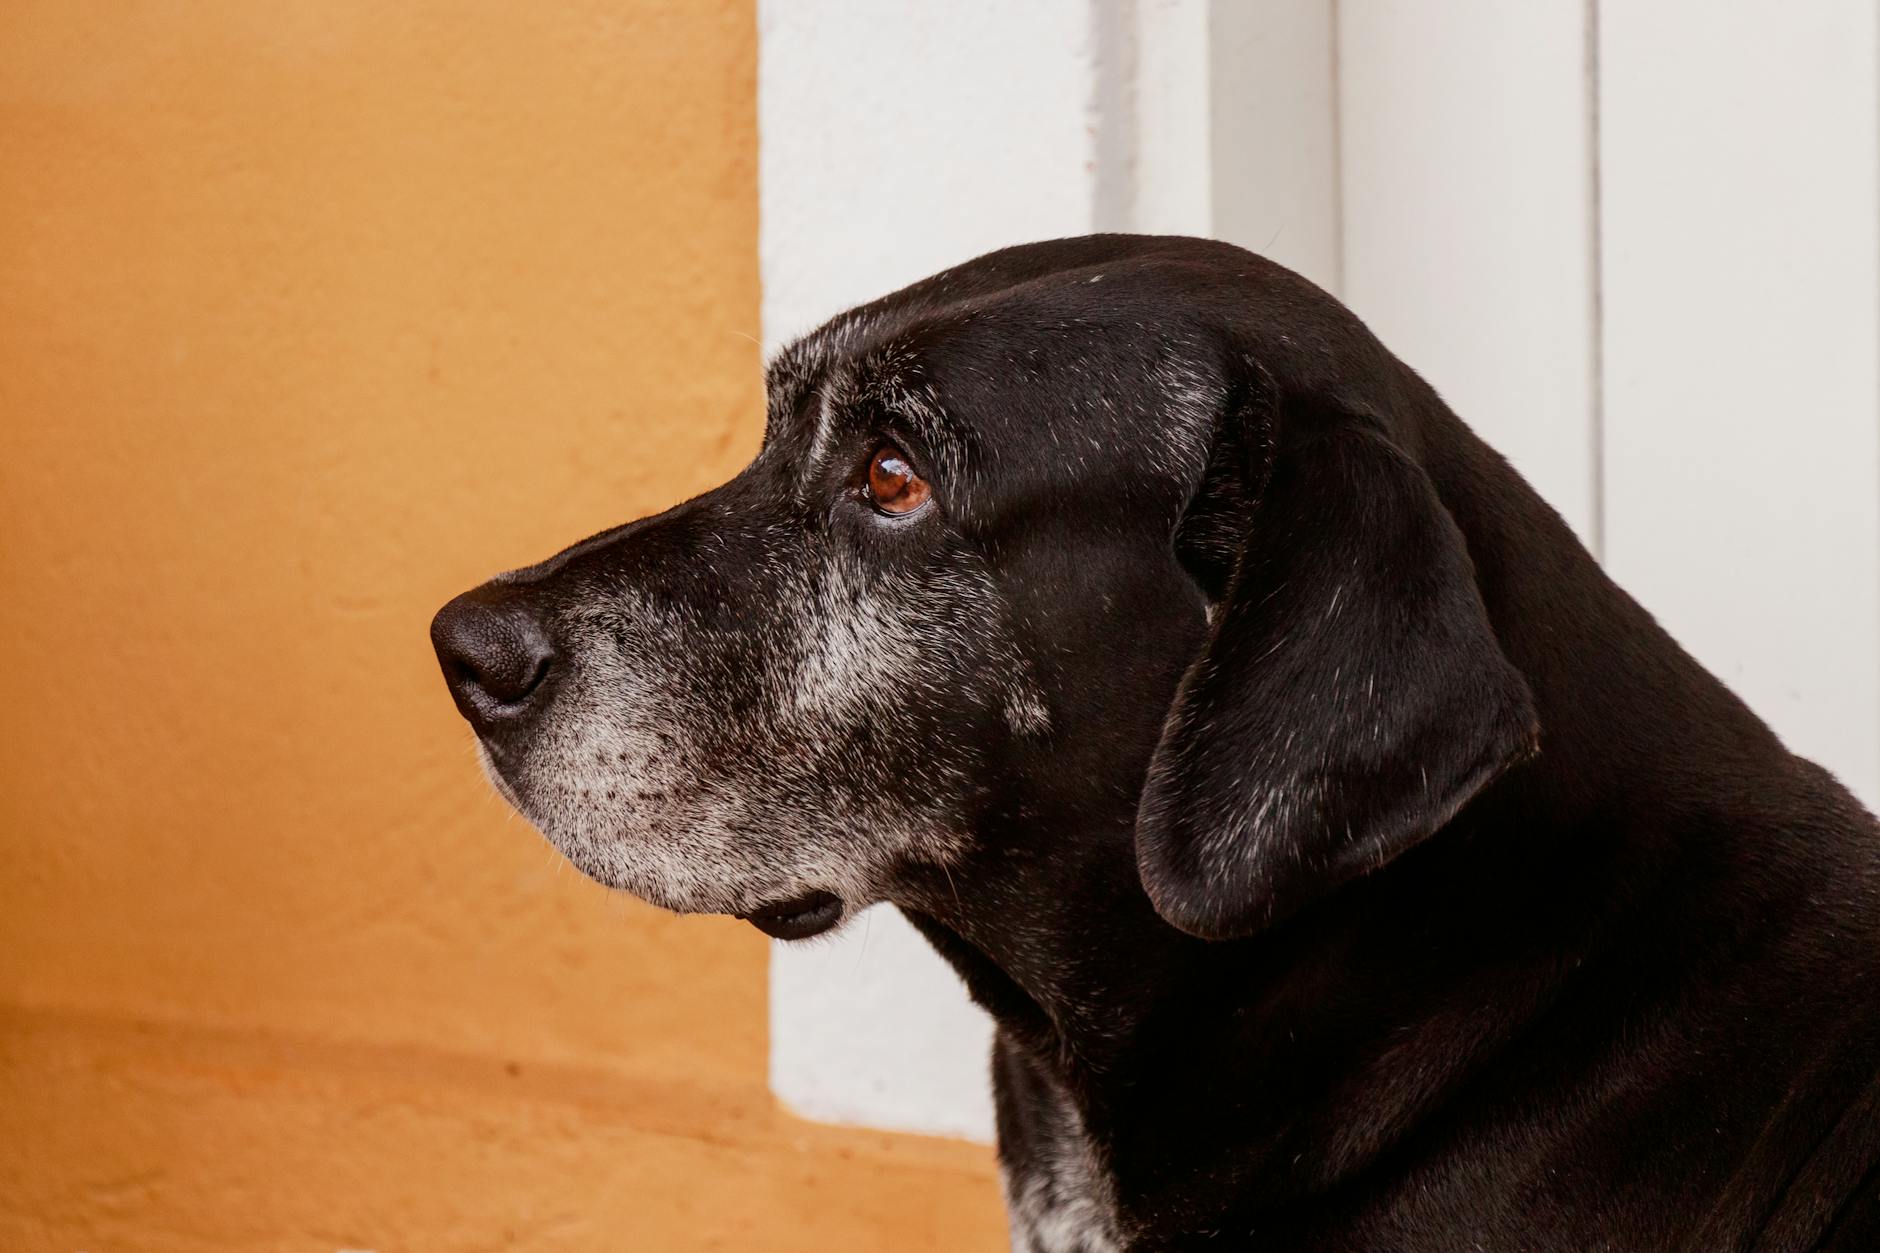
The other day, I had a new client come in with her senior dog for an annual exam. During the course of the examination, we went over the patient’s medications and supplements. Because the patient was taking non-steroidal anti-inflammatories (NSAIDs) on a regular basis, we ran screening lab work to make sure there were no significant abnormalities. This is particularly important as dogs as a species are sensitive to the side effects of NSAIDs, which can include GI upset and stomach ulcers, as well as liver and kidney issues.
My client mentioned that in addition to giving her dog carprofen (Rimadyl), she was also giving a joint supplement called Phycox. While there is nothing wrong with Phycox in and of itself–it’s a great supplement made by Dechra and I am considering giving it to my senior dog myself. Phycox has a combination of bioflavonids, tumeric, grape seed extrac, MSM, glucosamine and more. It is the only joint supplement that contains phycocyanin, which the Dechra website describes as “a natural anti-oxidant with powerful free radical scavenging properties. Free radicals can cause cellular damage and inflammation.”
But when the product was first launched,I seemed to recall that it was not a joint supplement that should be given in conjunction with NSAIDs. Because my patient was taking carprofen daily, I thought it wise to check to be sure that it was safe to use with NSAIDs. And so I did what most people do: I looked it up on the internet.
Whenever I do an internet search these days, I try to remember to add -ai to my search. This eliminates the AI summary at the top of the page, and returns your search to how the internet used to be in pre-AI days. At least, it does for now. I’m sure Google, Microsoft, Meta, and all the other major players in AI will figure out how to disable our work-arounds. But for now, this is what I do.
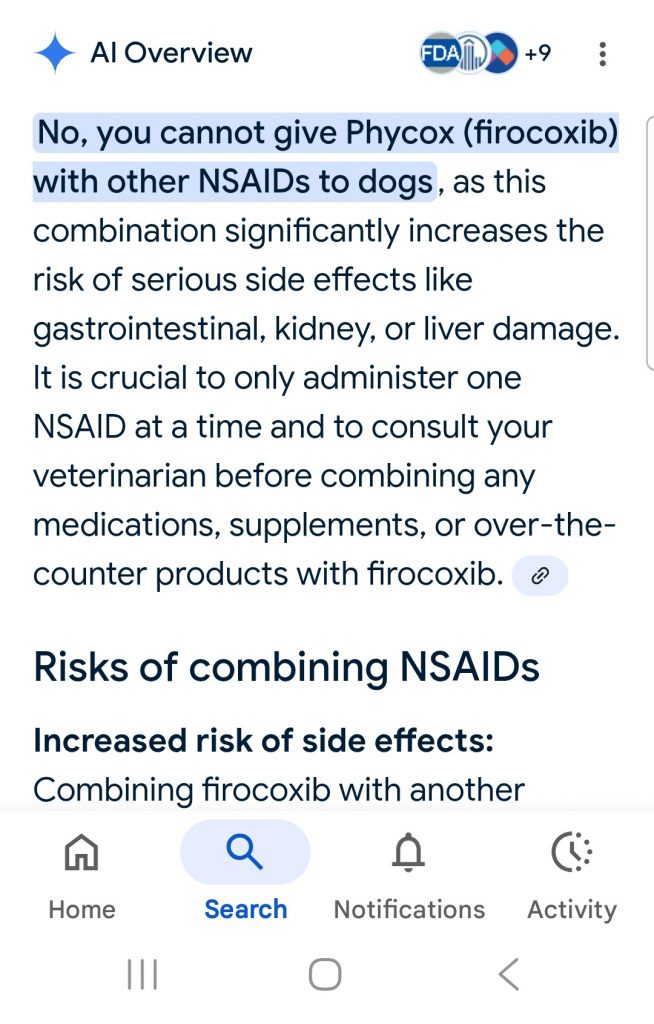
Only this time, I forgot to add “-ai” to my search. To my surprise, this is what the AI generated summary gave me:
Whoa! Phycox is NOT firocoxib!! Firocoxib is the generic name (or drug name) of the NSAID known as Previcox. These are not the same products! AI conflated the two products. The information given here is incorrect. Now, in this instance, no harm was done because having incorrectly labeled Phycox as another NSAID, AI correctly stated that you should not mix NSAIDs. But what if the opposite had happened? What if someone looked up Previcox and got the information for the wrong product and safely assumed it could be given to a dog already taking another NSAID? Here’s the kicker: if not for the fact that I’m a veterinarian, I might not have known this information was wrong. Potentially fatally wrong.
Here’s the kicker: if not for the fact that I’m a veterinarian, I might not have known this information was wrong. Potentially fatally wrong.
Let’s set aside for a moment the fact that generative AI has been built on the creative and scientific works across the internet without giving credit or financial recompense to any of these creative efforts. Ignore too, the fact that data centers already use up a huge amount of electricity and water, and that every simple AI search (like the one I inadvertently created above) uses a significant amount of both. Now compound that by the millions of searches taking place every second, or the fact posing a complex question of AI massively increases its consumption of resources. I’ve often said the internet is a source of opinions, not facts. In the past, a discerning user could reference the source material and determine which they were getting. But AI is folding in the opinions with the facts and presenting them as fact. And you may not have the expert knowledge to know the difference. The more AI is used, the more the built in flaws–like the one in the search shown above–will become apparent. But only if you can recognize them.
But AI is folding in the opinions with the facts and presenting them as fact. And you may not have the expert knowledge to know the difference.
I ended up contacting Dechra and asking if Phycox could be used in conjunction with NSAIDs. The representative said that was a very good question, and that if a decision was made to use Phycox in conjunction with NSAIDs, it should only be done with informed consent, and that you should be extra vigilant in monitoring lab work for any liver or kidney issues, or signs of stomach ulcers. Which I took to mean, “I wouldn’t do that if I were you.”
You might be saying right now, what does it matter if AI conflated the two products? It still gave you the right answer. Believe me, it matters. Because a right answer that is only a guess could be the wrong answer next time. There’s a reason why on math tests, you’re expected to show how you came to the correct answer. Show your work, AI.
Earlier today, I found out September 28th is World Rabies Day, celebrated annually to raise awareness about rabies prevention and to honor the anniversary of Louis Pasteur’s death, who developed the first rabies vaccine. This caused me to do a little research and I discovered that prior to the 1960s, several hundred people a year died in the US from rabies, and most of them were exposed by a rabid dog. Since the implementation of successful pet vaccination, more than 90% of reported cases of rabies in the US are in wildlife (most commonly foxes, skunks, raccoons, and bats) and typically fewer than 10 people in the US die from rabies each year. In Asia and Africa, dog rabies is still widespread and it results in about 60,000 deaths world-wide each year. The biggest reason for the decrease in overall exposure and fatalities is due to vaccination of pets and post-exposure prophylaxis (PEP) in people. Unfortunately, PEP is expensive and supplies are limited as well.
Certain wildlife species can act as reservoirs for rabies, which means that a large percentage of the population carries rabies at any given time. These reservoirs change by region, so while skunks are the highest risk group in the Southeast, foxes are a bigger risk in the Southwest and Alaska, and in Puerto Rico, over 80% of the mongoose encounters with humans and pets involve animals with rabies. In theory, any mammal can carry rabies, but in our area, skunks, raccoons, foxes, and bats are the Big Four vectors with ground hogs a distant fifth.
(Fun tidbit: the American possum rarely is a rabies vector. As a marsupial, their lower body temperature prevents them from being good hosts for the virus. They can spread leptospirosis, however.)
And the law is not on your side when it comes to a disease that is almost always fatal when contracted by humans.
World Rabies Day got me thinking about the various times rabies has factored into my life as a veterinarian. Rabies vaccination is a victim of its success–to the extent that now I’m often faced with explaining why it is so important to vaccinate your dog or cat for a disease few people will ever deal with personally. Vaccination is still necessary, however. There are times when I might suggest not continuing certain vaccines for one reason or another, but not rabies. For one thing, it is required by law. And the law is not on your side when it comes to a disease that is almost always fatal when contracted by humans. To date, there have been less than 20 documented human cases of rabies in which the victims survived, and those victims had poor functional outcomes. So if your dog or cat gets exposed to a rabid animal, it’s critical to have proof of previous vaccination to prevent severe regulatory consequences. If your dog or cat bites someone, proof of vaccination can go a long way to blunting the consequences of that act.
Frequently, I have to explain the difference between vaccinated and unvaccinated pets in the eyes of the law and in the face of exposure. Mind you, the law can vary from state to state depending on the severity of rabies within that state, so always check with your veterinarian if you have questions regarding these things. But in general, we know that if a dog or cat bites you BECAUSE it has rabies, it will die within 10-14 days. The risk of a vaccinated pet transmitting rabies is extremely low but not impossible, which is why most states enact a quarantine period of 10-14 days for any pet that has bitten someone, regardless of rabies vaccination status. Rabies vaccine effectiveness has not been proven in wolf-hybrids and is generally not recognized in the eyes of the law, which is why in some states, wolf-hybrids that bite are automatically euthanized and tested. There is no way to test a living animal for rabies, as the test requires examination of brain matter. This is one reason why you should never shoot a suspected rabid animal in the head–not only will you destroy the ability to test for rabies, but the virus is in the spinal fluid. The last thing you want to do is spray that around.
But if an animal (or human) is exposed to a rabid animal, it can take up to six months for the virus to effect the brain. Once symptoms of rabies are seen in humans, most die within 1-2 weeks, so the time to intervene with prophylactic treatment is right away at the first suggestion of exposure, before any clinical signs develop. This is because the virus, which is spread through the saliva and is also in spinal fluid, can enter your body through a wound, your eyes, or your open mouth–and then begins its slow journey to your central nervous system. You can see why being exposed through contact with fluids through your eye would reach the brain faster than a bite wound to your foot.
If your pet has been vaccinated prior to the time of exposure, a rabies booster will be given and your pet will likely be quarantined anywhere from 30-90 days depending on the laws in your area. A friend of mine had a dog bring home the head of a rabid skunk. Her dog had to remain quarantined on her property, no access to other people or animals, for 45 days. Even though it is extremely rare for a vaccinated dog to develop rabies, it’s not impossible. No vaccine is 100% effective, and if your dog or cat was sick when they were vaccinated (or given a steroid injection, or there was anything that altered the immune response), the vaccine might be ineffective.
If your pet is UNVACCINATED at the time of exposure, or the rabies vaccine has lapsed and is not up to date, you may be asked to strictly quarantine your pet in a pen within a pen, with no human contact whatsoever for six months. Basically, the assumption is your pet has a good chance of developing rabies from the exposure and every measure must be taken to prevent human exposure. It is a serious undertaking. The health department and animal control will be closely involved to make sure proper quarantine procedures will be taken. And your pet will have no understanding as to why you must cage it like this for so long.
Are there ever any serious reactions to rabies vaccination, both in people or animals? Yes. But I can count on one hand the number of adverse reactions I’ve seen in over 30 years of practice, and none in the last 20 years. Vaccines have come a long way over time. Safety and efficacy have improved tremendously just in the time I’ve been practicing medicine. Vaccines have done a tremendous job of reducing the number of cases and the severity of so many childhood diseases as well. According to an article posted by the American Lung Association, “Around 1900, well before vaccines were available, almost 20% of children died before their fifth birthday and the most common causes were infectious disease that can be prevented by the vaccines we have available today.” In my first job out of school, I worked in an extremely rural community where the vast majority of people didn’t vaccinate their pets for anything but rabies. I saw 40 cases of parvo the last month I was there. I haven’t seen 10 cases of parvo in the last 20 years. I worry that now that so many people are choosing not to vaccinate their pets, we’re going to see a return to those horrible days of isolation wards, PPE, and dogs dying from a preventable disease.
The first time I had any personal dealings with rabies, I was in vet school. Over twenty people were exposed to a rabid calf in the large animal department, students and faculty alike. I was fortunate not to be one of the exposed, but as a result, the decision came down from above that all students were to be vaccinated. This was not a decision taken lightly, but it is something that everyone who works in a high-risk profession, such as veterinarians, wildlife rehabbers, shelter workers, etc should consider. I got my vaccine series without issue and didn’t think about it much afterward. Because many people do react negatively to rabies vaccination, we’re not boosted every so often like dogs or cats. We get our titers checked. More on that later.
In my second year post graduation, I saw a seizuring dog on emergency. Initially, the patient, a stray dog that the clients had been taking care of for about a month, did not respond to any medication. I had a list of differentials that included epilepsy, poisons such as organophosphates or strychnine, canine distemper, and rabies. The patient seemed to spontaneously recover, and looked 100% normal. Eating, drinking, wagging his tail. And then he died. One minute acting normal, the next minute dead. All of the sudden, I had to move rabies to the top of my rule out list. I also had to fight with the local health department to get him tested. I’ll never forget the shocked look on the office manager’s face when she got off the phone with the results from the health department.
Post-exposure prophylaxis consists of two major steps: giving the exposed person a big dose of immunoglobulins that will immediately convey some immunity to the victim (called passive transfer) and then following up with a series of five vaccinations to trigger an active immune response. Everyone who handled or came into contact with this dog had to undergo this treatment–including the entire family who had been taking care of the dog all along. But I had already been vaccinated, so in my case, rather than getting 18 cc of immunoglobulins injected in the largest muscle on my body, they checked my titer first.
Aha! You say. See, if your titer is good, you don’t need boosters. We shouldn’t booster any rabies vaccine, right? WRONG. Because my titer was good, I got to skip the immunoglobulin injection but I still received two boosters (instead of five, like an unvaccinated person). Why? Because rabies will KILL you. If my titer had been low, I would have been treated exactly like an unvaccinated person. Fortunately, none of the people who were exposed to this dog developed rabies. It was the first documented case of rabies in that county in 12 years, which makes me wonder how many cases might have been missed.
I did cancel my dentist’s appointment during the PEP phase. No one questioned that decision.
Only a few years later, 40 people at a church picnic were exposed when someone brought a baby raccoon to the outing. Yes, even baby animals can have rabies. Everyone at the picnic who handled the raccoon had to be given PEP.
Yes, house cats and dogs need rabies vaccinations. I’ve had three clients have rabid bats get in their house. In two situations, not all the animals were up to date on their vaccinations, and the clients had to build a special pen inside another pen, so that it was impossible for anyone to touch the animal in the inner pen, and that pet had to stay in that pen for six months without human contact. In the third house, because we don’t vaccinate Guinea pigs for rabies, nor is there a known quarantine period, the health department required the Guinea pig to be euthanized. No choice.
My sister’s elderly, unvaccinated house cat bit its rescuer during extraction from a house fire. Despite the circumstances of the bite being understandable, the health department almost took my sister’s cat away from her, but eventually allowed home quarantine.
The saddest case I ever had to deal with was an entire litter of beautiful lab puppies. We’d just seen them the week before for their first puppy shots, but they were only 7 weeks old–too young to vaccinate for rabies. A skunk got into the outdoor pen with them where they were being kept and was killed. Confirmed rabies. The clients were given a choice: lock the puppies up in a pen within a pen with no human contact for six months, or euthanize the litter. They chose euthanasia because there was no way the puppies would be normal dogs after such restricted contact for the biggest part of their social and developmental growth. They’d basically be wild animals. It was one of the most devastating things I’ve ever had to do as a veterinarian.
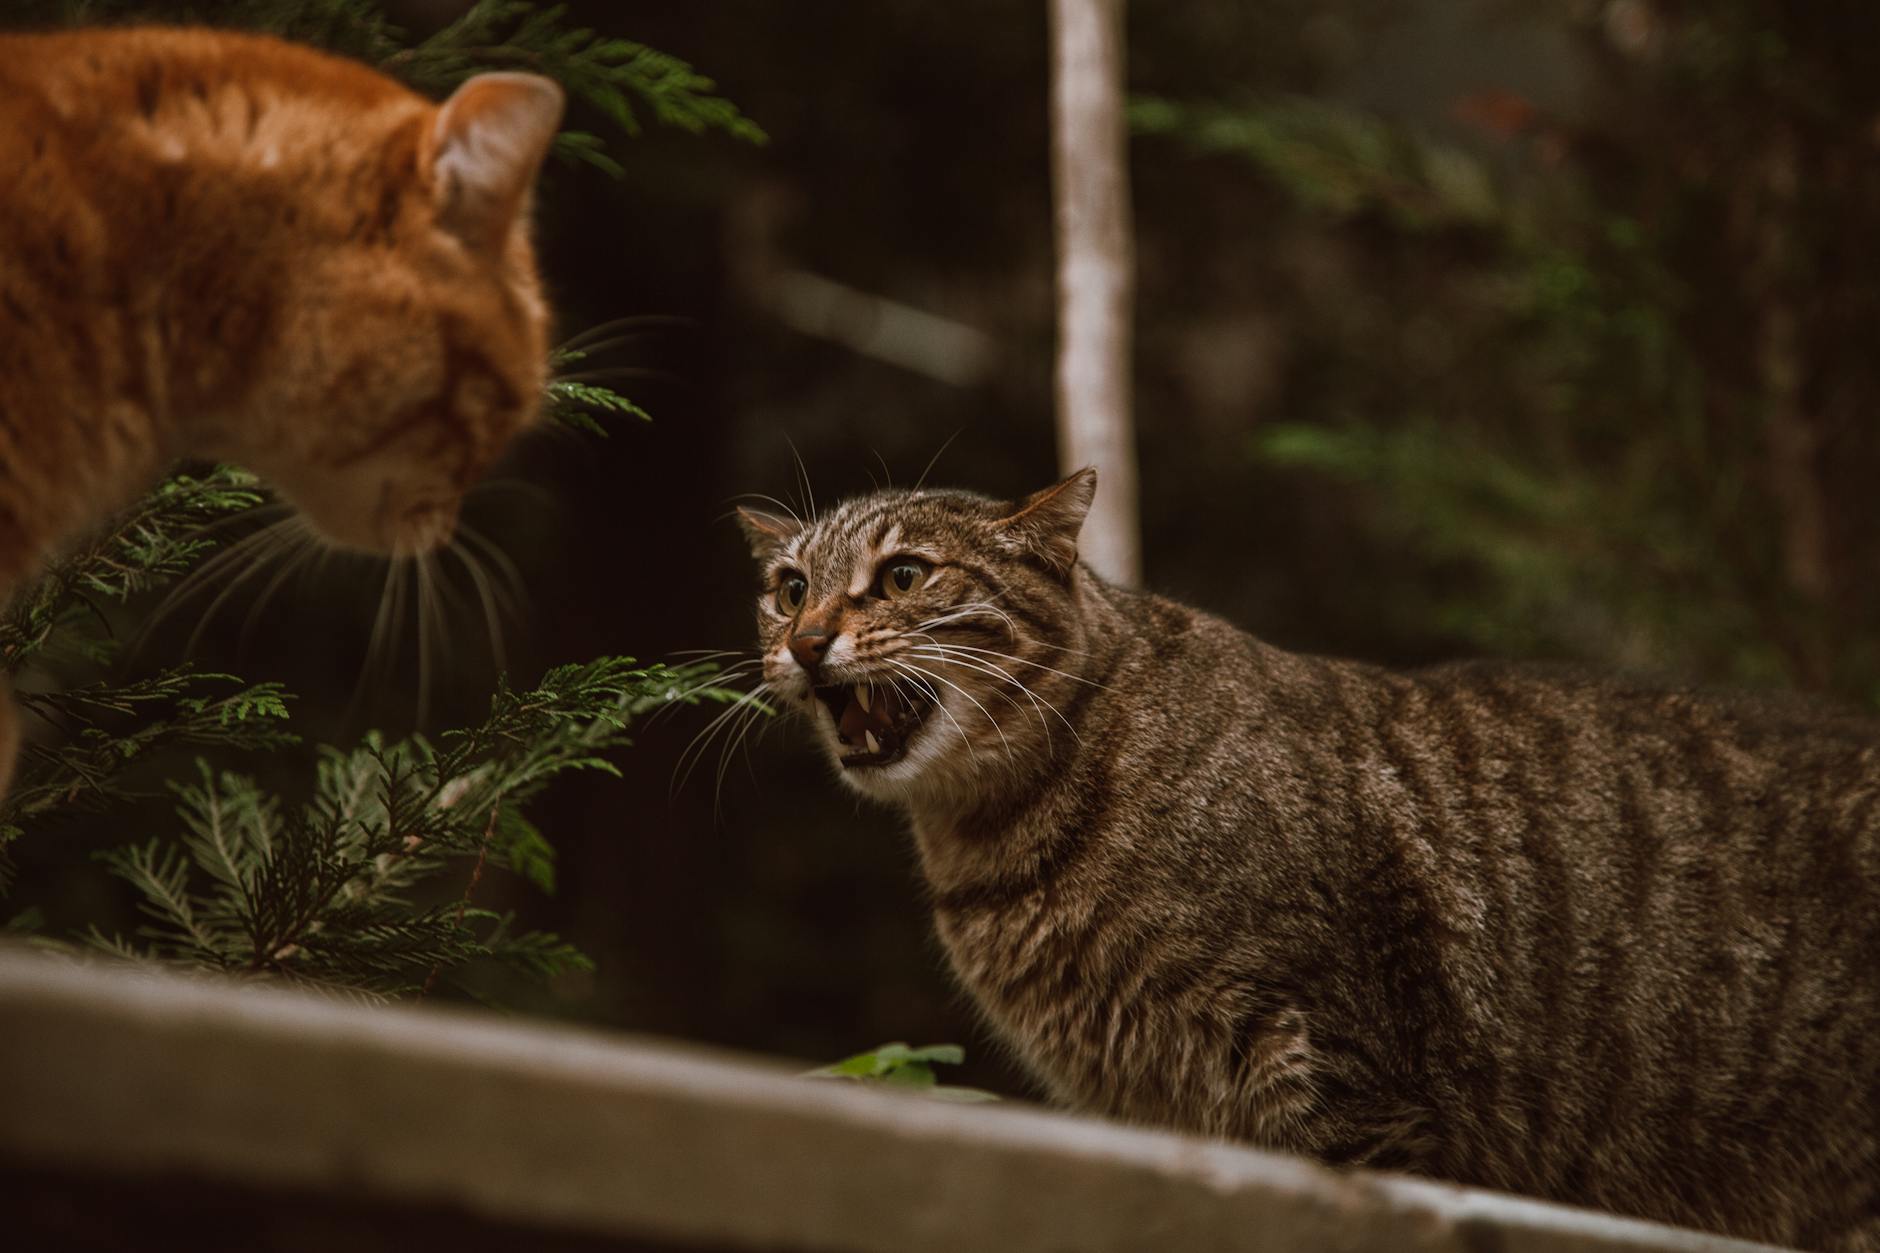
The most frustrating case I dealt with wasn’t actually a case of rabies but a situation in which I tried to persuade a client to stop letting an unvaccinated feral tomcat come inside and sleep on her three-year-old son’s bed at night.
“Ma,am. At the very least, you must get this cat vaccinated for rabies.”
She looked at me without comprehension. “Why? What does rabies do to you anyway?”
I gave her all the reasons why letting this unneutered, unvaccinated tomcat sleep with her child was a terrible idea. And then I told her to go watch Old Yeller. I’d say the same to you. If you have doubts about vaccinating for rabies, please. Go watch Old Yeller.
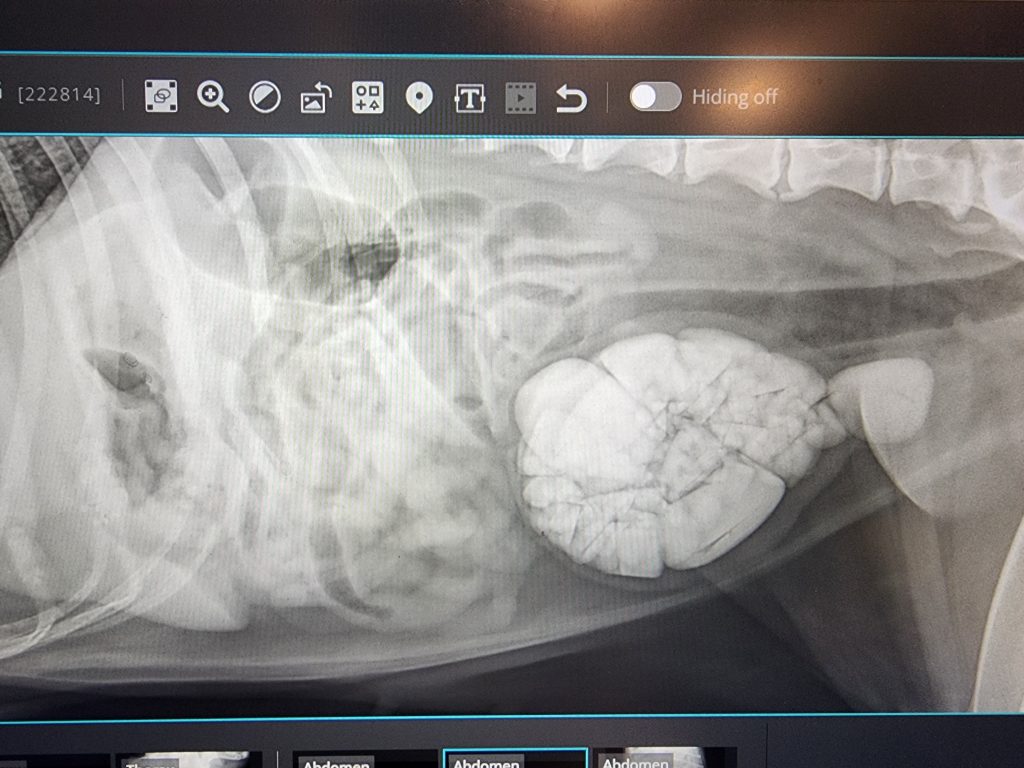
If you work in clinical practice in veterinary medicine, at some point you are likely to have sent bladder stones off to the Minnesota Urolith Center for analysis. Identifying the stone you’re dealing with is crucial to determining how to prevent future stone formation, often with specialized prescription diets. (The struvite stones depicted in the image above are ideally suited to control through diet) Because the MUC analyzes more stones than almost any other laboratory, they are in an unique position to identify early trends, and a few years ago, they began receiving new and unusual stones for identification. The new stones were comprised of choline and tartrate, but so few had been submitted, no one thought too much about it at first.
Then they began receiving more and more cases, mostly in small-breed, male dogs. MUC started collecting dietary information on the patients diagnosed with these stones, and they found a clear link between these uroliths and the use of choline bitartrate used in some of the more popular fresh food brands for dogs–such as Farmer’s Dog, JustForDogs, and NomNom brand foods. It is also commonly added to vitamin and mineral supplements available through such sites that help dog owners balance their homemade diets with a mineral mix. There have even been cases reported in humans taking supplements with choline bitartrate in them.
What is choline bitartrate anyway? It’s a salt of tartaric acid, making it a bioavailable form of choline in diets. Tartaric acid is the ingredient in grapes and raisins that make them lethal to pets, and ingestion of cream of tartar is also toxic as well! (I have a favorite holiday cookie recipe that calls for cream of tartar that I no longer make, as I consider the risk of accidental ingestion by one of the pets too great a risk) Choline bitartrate is not the same as tartaric acid, and yet clearly there are downsides of feeding it to our pets. To make matters more confusing, not all of the dog food companies studied specify what type of choline bitartrate is used in their brands, and it is possible that some types are safer than others.
The paper detailing the discovery of these stones and their link to choline bitartrate in the diet was first published in the Journal of Veterinary Internal Medicine in April 2025, but it wasn’t until a Facebook post by a veterinary clinic warning of the dangers of feeding fresh pet foods, such as the brands listed above, that information about this issue really took off on my social media. I don’t spend much time on Facebook, so I hadn’t run across the articles, but several people emailed me links, usually with the title “DON’T FEED FARMER’S DOG” in the subject line.
That’s how it was framed: Don’t feed X Brand, instead of “here’s an ingredient you should check to make sure is not in your dog’s food or supplements.” The pet food/pet influencer industry generates a lot of money, and it would be naive to think there aren’t people who have a certain desire to control the narrative. Especially when a single post can be so easily shared over and over again on Facebook. I came across a follow up post recently, in which the OP stated they were not advocating changing foods without talking to your veterinarian, but the odds are only a fraction of Facebook users saw that post.
The thing is, this warning isn’t meant to be an attack on a particular brand of fresh pet foods. I found choline bitartrate listed in certain lines of Wysong foods, as well as some lines of American Natural Premium foods, and several joint supplements, such as those made by MaxxiPaws. Ollie dog food listed this ingredient as well. It’s a recognition that we as pet caretakers need to be aware of this new issue and its cause, and take steps to protect our dogs, particularly if they fall into the higher risk categories of being a male, small breed dog.
I checked my own dog’s food after the Facebook post. I confess to a sigh of relief when I saw his food contained choline chloride and not bitartrate. The problem is, there will be no way of knowing moving forward if the type of choline bitartrate makes a difference and if companies have taken the steps to make this ingredient safer to feed.
I’ll be the first to state here, I am NOT a nutritionist. But there are some things I caution my clients about feeding their pets. There have been cases of raw diets contaminated with the bird flu killing cats, and the bird flu has been reported in cattle and swine as well as poultry. I’ve never been a big fan of raw diets, and given the FDA has scaled back its food safety inspections, I am even less likely to recommend feeding raw diets, particularly since recent events within the CDC make it doubtful bird flu is being closely monitored. With the rise in popularity of grain-free diets, we saw concerns about certain heart protective amino acids not being bioavailable in GF diets, thus showing a correlation in the increase of cardiomyopathy, particularly in dogs. I do not recommend grain-free diets for our pets, despite the fact that on any of the most popular “Ten Best Dog Foods” list, 90% of the foods listed are usually grain-free. I think the rise of the influencer culture has been a big factor in the increased popularity of these foods, as well as some of the negative marketing campaigns I’ve seen aimed at some of the big dog food companies (not that these companies are necessarily blameless when it comes to food safety).
So, you must realize here I am biased in my own way regarding pet foods. You must take anything I say with that in mind. But I will tell you that when I speak with veterinary nutritionists, dermatologists, and cardiologists, none of them recommend feeding BEG diets: Boutique, Exotic, Grain-Free. And every single cardiologist I have ever spoken with tells me the first thing they do when diagnosing a new cardiac patient is take them off BEG diets if they are being fed.
So for now, I’m going to continue to read my labels, and avoid any diets with choline bitartrate in them.
Just in time for Black Friday/Cyber Monday, Understanding Your Pet’s Labwork: A Guide to Communicating with Your Veterinarian is on sale for a limited time. Looking for the perfect holiday gift for the pet lover in your life? This unique reference book is designed for the discerning dog or cat lover who would like to understand in more detail what it means when your dog’s ALKP is high, or why imbalances in electrolytes are so concerning.
Empower yourself as a pet parent to ask the right questions when faced with certain test results, and have a better understanding of why your veterinarian recommends certain courses of action.
Veterinarians and veterinary professionals may also find this resource useful when explaining the implications behind certain test results, and open up a clearer dialog between you and your clients.
This is a reference book that can be used in many ways: as a resource when looking up specific test results, as a text to be read over time when you’d to know more how veterinarians view diagnostic testing, or if you’d like a simple analogy to explain how the kidneys or the pancreas works.
Understanding Your Pet’s Labwork has been discounted for this weekend alone, so grab your copy at this price while you can!
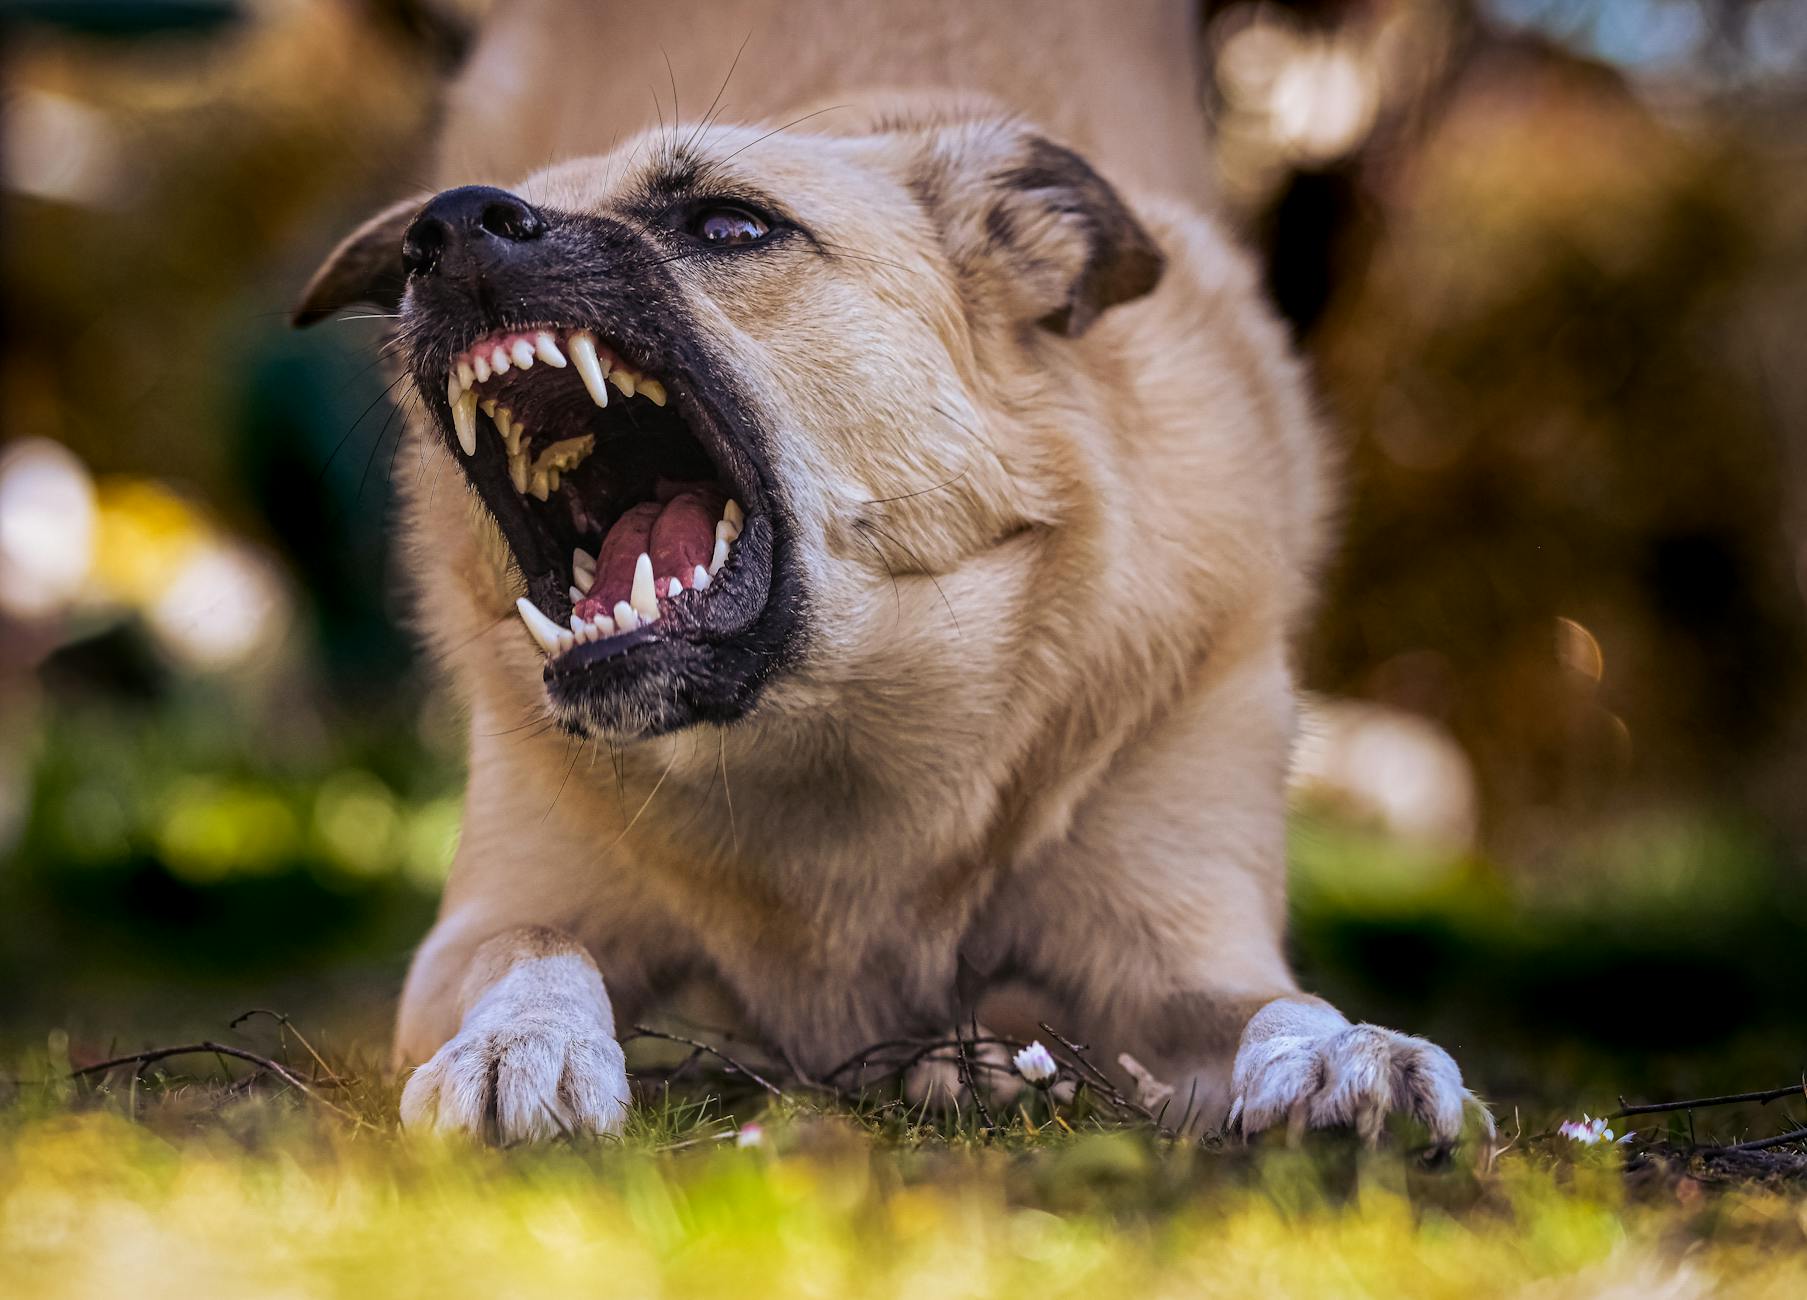
It’s a fact of veterinary medicine that sometimes we must muzzle our patients in order to have their cooperation and to protect the people handling them. This isn’t something we like to do as a matter of routine. For years, I’ve been using cheese and treats to make the vet experience positive for puppies and kittens, and many of those animals grow up being excited to see us.
But that method doesn’t always work. Farm dogs who only see a vet for the occasional rabies shot, dogs who have more important things to do and resist the notion of holding still, cats who never leave the house except when they are ill, animals that have had bad experiences elsewhere or are so terrified at the vet’s office they shut down, unable or unwilling to accept rewards–these are challenging patients. As are the aggressive patients or undersocialized patients: the feral tomcats, flock dogs that have never seen the inside of a building, animals who believe a good offense is the best defense.
It doesn’t help that the veterinary profession has been under a lot of strain for years–and only just now are getting the recognition of this fact. Job burnout is high. Clinics are chronically understaffed, staff members are chronically overworked. The job itself is fraught with emotional, physical, and mental stress. The veterinary profession must deal with what researchers call “the caring-killing paradox“, in which we are sometimes forced to end the life of a patient we’ve been taking care of since it was a puppy or kitten, even though this may be the humane, necessary, or only viable option. Clients blow up at staff members, accusing us of “only being in it for the money” when the costs of practicing high quality medicine are often outside our control and because if we can’t afford to pay our staff and our bills, we won’t be there for your pets. Cyberbullying has a huge impact on the mental health of those in the profession. Professionals have been literally threatened–even killed–by disgruntled clients. The suicide rate among female veterinarians is 3.5 times the national average, and male veterinary technicians are five times more likely to commit suicide. According to the CDC studies, one in six veterinarians has contemplated ending their lives.
As one article I read said, “You’re always failing someone.”
In the past, I have worked in practices where appointments were booked every 10 minutes, and the emphasis was on getting things done and staying on schedule. There is very little time in situations such as these to accommodate a fearful or aggressive pet. Thank goodness, by far and large, the profession has moved away from this model!
But often, it’s not a simple matter of slipping a muzzle on the animal and presto! You can suddenly draw blood samples or palpate a tense abdomen. Sometimes, even the most competent professionals cannot get the animal safely contained.
Fortunately, with the advent of Fear Free training and the emphasis on fear-free veterinary experiences, we’re seeing the tide turn when it comes to restraint practices. This often means using what we call the “chill protocol” (a combination of anti-anxiety and calming medications) prior to the vet visit, which not only brings the fear levels down in the patient, but also in the people who have to handle them in the clinic. We still have to use muzzles and restraint methods on many of these pets, but everyone is much calmer. This not only facilitates drawing lab samples, but performing physical examinations on some animals that will not allow anyone except their owners to touch them. If your veterinarian suggests something along these lines, please understand we are trying to create a more positive experience for all concerned.
Many of the patients we’re seeing now were pandemic puppies and kittens–an entire generation of undersocialized animals who saw only their own people during lockdown. While I wouldn’t wish this on any of us, one of the good things to come out of this is the recognition that something needs to change when it comes to handling such fearful pets on a regular basis.
But we still have pets who freak out when muzzled–an apparent panic attack–even with anti-anxiety medication on board. It wasn’t until an experience at the dentist several years ago that I figured out why. Like some animals and vet visits, many of us have a fear of going to the dentist. We’ve felt extreme pain, or our jaws ached for days after having work done. I don’t like going myself, despite the fact I have an outstanding dentist. (In fact, I drive almost an hour to see him because I trust him when it comes to painful procedures).
At that time, I had to have an impression mold done for some dental work I needed. This required filling a tray with what seemed like Silly Putty and having me bite down on this until the jelly-like mass filled my mouth. Then I had to sit there for several minutes, breathing through my nose, while the molding putty hardened. The glutinous mess filled my oral cavity and pressed on my upper palate. It obstructed the back of my throat. And while I labored to pull air in and out of my chronically inflamed, allergic nasal passages for those two minutes I had to endure the process, I gripped the armrests of my chair until my fingers ached and drummed my heels on the seat, all the while my adrenaline surged. I thought I was going to die.
I came away from the experience understanding why some dogs flip out when they are muzzled. See, the type of muzzle most often used in vet med is a nylon or mesh muzzle which holds the mouth tightly shut. Dogs cannot pant wearing this type of muzzle. We can only leave it on for brief periods of time, as the patient is at risk of overheating. It’s not the sort of muzzle for home use, and so animals learn to associate it with vet visits as well. There are different muzzles designed for the flat faced breeds and cats, but I’d observed that some animals with regular snouts didn’t breath well when muzzled (so we worked very fast).
My experience at the dentist changed everything. Now I got it. I really got it. Some muzzled animals believed they were going to die.
The first thing I did was begin instituting the use of basket muzzles for those highly fearful dogs that needed to wear a muzzle for their entire visit. These are plastic or wire muzzles that allow the patient to open their mouths, pant, drink water and accept high-value treats but not bite. (I prefer the plastic ones for veterinary use because getting punched with a wire muzzle still hurts a lot!)
The difference in some dogs was amazing. They still weren’t happy about their vet visits, and most still needed medication to make things easier for everyone involved. But that level of panic that would make us abandon further attempts to perform our exam, draw blood, etc. wasn’t there. Best of all, clients could order their own muzzles and practice habituating the dogs to them at home. They could arrive wearing a basket muzzle because overheating wasn’t an issue. And we didn’t have to start our visit trying to corral a patient into wearing a safety device. Frankly, I wish I’d instituted basket muzzles sooner.
The brand I recommend most often is made by Baskerville. They are well constructed and come in a variety of sizes. (The one linked here is for a medium sized dog–make sure you read the specs before ordering any for your own dog). I recommend placing a little squeeze cheese or peanut butter inside the muzzle and encouraging your dog to place his snout inside, holding it in place for short periods while he gets his treat, and gradually working up to buckling it on and having him wear it for longer increments of time at home. This is the sort of training that needs to be done well in advance of vet visits. But training your dog to wear a muzzle and the use of the chill protocol can ease the trauma of vet visits for these pets–and it is a trauma to them. But having less terrifying experiences over time lessens the fear and aggression for many of these dogs, and these visits become less traumatic for everyone.
I recently had to have an emergency root canal. I told my dentist up front about the fact I didn’t breathe well through my nose and the panic that ensued when I thought I couldn’t breathe. He took these things into consideration, and we arranged a sort of “safe signal” so I could tap out when I needed a break. We got through the procedure, even though I wouldn’t wish it on even my worst enemy. Afterward, speaking slowly in an attempt to enunciate with half my face numb, I told him what I’d learned at his hands.
He laughed. I’m sure he’ll be dining out on that story in the future.
Recently, I had a client come in with her senior dog, concerned because he wasn’t eating with the same enthusiasm as he did before. This is not uncommon in senior pets, and can be rooted in medical problems, which should be ruled out. But after determining that her dog’s lab work was normal (CBC, chemistry panel, urinalysis and fecal), and performing a complete physical to rule out underlying conditions that might affect his appetite, such as heart disease, or dental disease affecting his ability to chew, we came to the conclusion that her dog Sonny simply needed more supportive care around the house.
Not all that long ago, I took an online seminar on aging pets with speaker Dr. Mary Gardner, and I was pleased to find out I was already implementing many of the things she suggested in her talk. So the first thing we looked at was Sonny’s feeding arrangements.
It turns out his owner was using a slow feeder bowl for Sonny because he used to gulp his food ravenously. Hey, I’ve been there! My previous German Shepherd definitely needed a slow feeder bowl, but when I got my current dog, it took him over an hour to eat his dinner out of the same bowl! Clearly Captain didn’t need a slow feeder, and likewise, Sonny didn’t either. The needs of your pet can change over time. Most likely, Sonny found getting food out of the slow feeder bowl too challenging, and as a result, gave up on eating while there was still food left.
Another thing we observed in the exam room was that Sonny had mobility issues on slick floors, and seemed to have difficulty lowering his head to eat and drink while maintaining his balance. Many dogs are less active with advanced age, and the hair on the bottoms of their feet can grow excessively long, acting like little slippers on slick surfaces. Sonny definitely had fuzzy feet, so we shaved the bottoms of his paws between the pads to help with traction. Dogs who get groomed regularly usually get this treatment, but Sonny had never been groomed before. I suggested to his owner that she invest in a small cordless trimmer like the one we used in the clinic.
I also like to make safe pathways through the house and around feeding stations. Yoga matting can be ideal for this situation. You can even purchase it in commercial rolls to cut to the size needed.
If altering the flooring situation isn’t feasible, there are several products out there aimed at improving traction. I frequently recommend Dr. Buzby’s toe grips for dogs. They aren’t for every dog–some resent having anything on their nails and will chew them off–but for many dogs the improvement in traction greatly improves their desire to be more mobile, which in turn helps maintain muscle mass.
Another type of traction device are these pad grips. Just like slipper socks worn in hospitals or by elderly people at home, these pads provide little friction bumps on the bottoms of the feet. Dr. Gardner suggests actually cutting them and adhering them separately to each pad so they fit better, which is an excellent suggestion and one I utilize now. There are many different brands out there; I’m linking to one here.
The other thing I recommended for Sonny was to consider an elevated food and water bowl. Arthritis in his neck was probably impacting his ability to stand with his head lowered for a significant period of time, and he would just give up. It wasn’t worth it to him to continue trying to eat under those circumstances. Again, there are a wide variety of options out there, I am just linking one as an example.
One of the most valuable tools I got out of Dr. Gardner’s webinar, however, were the journals and guides she’s created for the senior dog and cat. I’ll do a separate post on the special needs of cats in the future, as well as one on sundowning behavior in our senior pets, but I found both of these products very useful.
As someone with a senior dog who is starting to slow down, as well as show signs of some hearing loss and cognitive changes, I think having the means to track these changes will be very useful. Speaking of which, I was one of the beta testers for Suzanne Clothier’s Functional Assessment Tracking app for dogs. FAT is a unique tool for tracking a dog’s cognitive, physiological, and social well-being. It’s not just limited to senior dogs, however. The implications for its use are widespread among trainers, veterinarians, service dog handlers, boarding facilities, you name it! I highly recommend you check it out.
By the way, a week later, Sonny’s person called with an update: after instituting some changes, Sonny was back to cleaning up his meals with gusto!
The second announcement goes hand in hand with the first: I’m so pleased to be offering a digital course on Understanding Your Pet’s Labwork in conjunction with Suzanne Clothier on October 12th, at 3 pm EST.
If you’re not familiar with Suzanne, she is a highly respected dog trainer, international speaker, the bestselling author of Bones Would Rain From The Sky, and the founder of Relationship Centered Training.
I met Suzanne many years ago when I had a German Shepherd named Abbey, who’d become dog-reactive after being attacked by a neighbor’s pack of dogs that had every intention of killing her. As far as Abbey was concerned after this event, a good offense was the best defense. At the time, Suzanne was running Camp Dances with Dogs, and she agreed to have Abbey and I join as participants. I’ll never forget watching Suzanne assess my dog very accurately within a matter of minutes and determine that she wasn’t aggressive–she was terrified of being jumped again. I could scarcely believe it when Suzanne was able to select dogs out of the group that would be non-threatening to Abbey and introduce her in a controlled setting. I watched my dog relax and play for the first time in years.
My experience at Camp DWD that year had a profound impact on my life. I came away from camp not only wanting to have a different kind of relationship with my dog, but wanting to practice a different style of medicine too.
During one of my camp attendances, Suzanne invited me to be a guest speaker. I chose to talk about lab work, and why I thought it was important for pet owners to have a basic understanding of the most common test run and the implications of their results. Afterward, she encouraged me to write a book about it, and Understanding Your Pet’s Labwork was born.
It was many years in the making, however. At the time, self-publishing wasn’t possible, and I had a hard time finding a publisher who didn’t want to reduce the text to a series of bullet points. When self-publishing became widely available, it still wasn’t possible to format the charts and tables I needed. When the industry changed to accommodate such needs, it had been so long since I’d written the original material, that I had some serious editing and updating to do. In the end, I’m glad it was such a lengthy process because I’m a much better writer now than I was when I first started this project.
So I am greatly honored to be doing this webinar in conjunction with Suzanne. I’ll be hitting the highlights of the book, explaining the CBC, the chem panel, the urinalysis, and other common lab tests run. There will be a Q&A at the end, too! Not to worry if you can’t make it to the seminar live: everyone who signs up for the course will have access to the recorded material later. Win-Win for everyone!
It can be one of the most challenging things I’m asked to do as a veterinarian: Could you trim my dog or cat’s toenails?
Frequently, by the time a client is bringing a pet to us for a nail trim, it’s because no one else can do it. The expectation that somehow our staff will magically be able to perform this task after half a dozen or so other people have tried and failed is a tough one to overcome.
What many people don’t realize is can take up to one thousand good experiences to negate a single negative one. And once an animal has experienced being muscled down in order to facilitate a nail trim, the process of retraining your pet to accept this without fear or aggression may well mean that for the time being, your pet won’t be getting the nails trimmed the way you’d like them to be.
Before we discuss the re-training process on a failed nail trimming pet, let’s talk about starting out on the right paw, so to speak.
If you are fortunate enough to have adopted your pet as a young puppy or kitten, you’re in luck. You can start out teaching your young pet to accept nail trimming with lots of treats and gentle handling. I usually recommend using a human toenail trimmer at this stage, as you are both learning this process at the same time, and I find you have better control with a human nail clipper. Your pet’s nails are quite small at this juncture, and it is easier not to take too much off with the human nail clippers. As my pet gets larger (especially big dogs), I tend to switch to a scissors-type clipper. I’m not fond of the clippers that have a blade that slides forward to cut the nail, as many animals seem to act as though this pinches the nail. I prefer continuing to use human nail clippers even on adult cats, though at times cat-specific clippers may be needed, especially for ingrown nails.
Because cat’s nails are retractable, it helps to gently squeeze the paw to make the nails extend, and then you can just tip them with the clippers. Cats need access to scratching poles to shed the nail caps of old growth, and older cats no longer using poles will frequently get painful ingrown nails. Cats with extra toes frequently have similar issues with ingrown nails as they often can’t scratch with the extra toes, and even though declawing in general is not recommended, there are times when your vet may recommend declawing just the extra toes to prevent recurrent issues with growth.
Ideally, during the training process, it is helpful to have some assistance: one person to hold the puppy and give out treats while someone else trims the nails. The most important part about these sessions is that you don’t frighten the pet, or attempt to do too many nails at one time if you are meeting resistance on their part. You don’t want to teach your pet that fighting is the way out of doing something they don’t want to do, but you also don’t want nail trimming (or anything else for that matter) to turn into a major battle. I recommend starting the training within a day or two of adoption, and plan in advance to only clip one or two nails, with lots of praise and treats. Then come back again the next day and attempt a few more. Take your time. Also, choose your time wisely–a good time to attempt nail trimming is after your puppy has been playing hard and is tired.
The nails of young animals frequently have a defined “hook” at the tip that makes it easy to judge how much to take off. Just be sure to trim less than you think you can at first until both you and your pet are comfortable with the process.
I sometimes use a grinder or nail file post clipping, but not at first (one lesson at a time, build up to grinding) and not as the sole means of keeping the nails short. Used incorrectly, a grinder can overheat and burn the nail, and make your pet fearful of not only grinders but motorized clippers/shears too. The length of time it takes to grind down a long nail is longer than you realize. Best to shorten the nail first and take down the sharp edges with a grinder or file.
Just like us, animals have a nail that extends beyond the pink fleshy bit. If you’re lucky and your pet has some white nails, you can use those to judge how much to trim off the others. Cutting the nails too short WILL hurt and can make them bleed as well. This is something you want to avoid during the training and trust period so be very conservative at first. Nails grow at the rate of roughly 1/4 inch per month. You have plenty of time to go slow and teach good experiences from the start.
Short, frequent sessions with lots of praise and high value rewards (usually the kind of treat reserved for this procedure only) is the best, most reliable way to teach a puppy or kitten to have their nails cut. They now make “lick it” type cat treats that work very well for this sort of thing too. Once I teach my pets to have their nails trimmed, I usually don’t need any assistance whatsoever. I still be sure to reward them during the clipping process and again when we’re done.
Many people don’t realize that the pink part visible inside a white nail will bleed if cut, and that the blood supply can extend further than readily visible to the naked eye. We often get requests for nail trims “as short as possible” and then clients are disappointed when we don’t cut the nails back the way they would prefer. ‘Stop Quik‘ and styptic pencils used to stop bleeding if you get the nails too short can sting when applied, and this just compounds the negative experience. When in doubt, take off less.
I also prefer to have someone suspend a small dog or puppy in their arms when I’m trimming nails. This allows me to get beneath the paws and have a clear visual on how much to trim while at the same time preventing the patient from pushing off the table or floor with their feet. Again, someone is giving out treats the entire time–usually something high value like squeeze cheese or peanut butter. We have to be careful using peanut butter in a clinical setting as we must be cognizant of clients with peanut allergies, but this is certainly something you can try at home. I personally think most dogs get tired of peanut butter quickly, and it may be hard to perform a complete nail trim using it. Experiment with treats to find the one your dog really likes for this procedure. It may not be the same thing you’d use in different circumstances.
I’m sure you’ve seen or heard of people putting peanut butter on Saran wrap on their foreheads or on a hat and trimming their dogs nails without assistance while the pet licks their heads. I’m not a huge fan of this myself, as I think there is a risk putting your face that close to an animal who may or may not tolerate nail clipping. This is definitely not something I would try with an adult animal who has issues with nail trimming. I have, however, put peanut butter, squeeze cheese/cream cheese, or canned cat food on the wall at nose level while someone holds the pet in place and I clip nails.
Why does “slinging” a pet seem to work? Because in order to prevent a dog from wiggling out of your grasp, or pulling its paw away just as you go to snip, or worse, trying to bite you during the process, we typically hold the dog in a precise manner: one arm stabilizing the body, and one arm around the neck to control the head and keep the dog from biting at your hands. This is a common position for many procedures during the course of examining a dog, administering vaccinations, taking temperatures, placing a catheter, drawing blood samples, and yes, clipping nails…
Teaching your young animal to accept being held in this manner by a variety of people, including lots of high value rewards during the process is something I highly recommend. I encourage clients with new pets to practice these techniques regularly with young animals to develop trust even when it comes to performing unpleasant tasks.
But if your pet has a bad experience during nail clipping, in which several people attempt to forcibly hold your pet in place to perform the trimming, this will not only teach your pet to become highly resistant to nail clipping, but to ALL the procedures we need to perform at the vet’s office. Some animals seem more comfortable and less panicky in a sling than being body-hugged by several people. Slinging controls the body while keeping the trimmer’s hands to stay out of reach of the dog’s mouth and allows for excellent visualization of the feet. Sometimes, less is more when it comes to necessary restraint for medical procedures.
Sometimes, less is more when it comes to necessary restraint for medical procedures.
In order to take the “less is more” approach, however, and still ensure the procedure is performed (whatever that may be) as well as maintain the safety of all involved, sometimes this means muzzling your dog (or putting a specially-designed globe on your cat’s head like a spaceman’s helmet) so that only minimal restraint is necessary. Muzzling + high value food reward (such as fresh cooked chicken or tuna) + minimal restraint (someone lightly keeping the animal in one place or using a sling) can be more effective and less traumatic for EVERYONE than calling in three or four people to man-handle the pet into compliance. Most animals will fight even harder if forcibly restrained, to the point of injuring themselves and those holding them, and you’re teaching them that such procedures are bad, scary things. Animals with flat faces (such as Pugs or Persians) who can’t breathe well in the first place, justifiably panic if you attempt to keep their mouth closed during a nail trim.
Because we want to take our time with a fearful, aggressive patient that presents for a nail trim, I usually recommend the client purchase a basket muzzle and teach the dog to accept wearing it at home in a non-scary situation. Basket muzzles are designed to allow your dog to pant, drink water, and accept treats. They can wear these muzzles for a longer period of time than the traditional cloth muzzles, which can cause a dog to overheat quickly and is disastrous for a dog who can’t breathe through its nose. I also advise the client we many only get one or two nails done–our goal is to make the visit as happy as possible. I may recommend anti-anxiety medication or tranquilizers as well. I tell people up front that it is more important that we have a good nail clipping experience than to get all the nails trimmed.
I often see resistance on the part of owners to the idea of using a basket muzzle on their fearful or aggressive dogs for vet visits. I can understand their concern. We aren’t saying your dog is a bad dog, however. We’re recognizing the anxiety your pet experiences coming to the vet for medical procedures and by taking the option of biting out of the picture–as well as lowering the risk to all handlers–we’ve seen HUGE differences in the level of comfort and cooperation many of these dogs exhibit when someone tries to hold them safely. It’s the restraint for the procedure that is often the biggest problem, not the act of drawing blood or administering vaccines. Wearing the muzzle while not being forcibly held in place allows for positive reinforcement and reconditioning of a negative experience.
Unfortunately, by the time I see a pet for a nail trim, it is often because several other people have tried to manhandle the pet into compliance. Now the pet is fearful and aggressive about nail-trimming–and justifiably so. Nail trimming is often the one thing that even when we practice all the fear-reducing and safety protocols recommended, we still might not be able to do the nail trim. Remember, it can take a thousand good experiences to negate a bad one, and re-training a dog to accept nail clipping is a long, painstaking procedure that is not always successful. Some dogs need medication to manage their anxiety during the training process. Some dogs, due to the potential for human injury, can only have their nails done under general sedation, which is not practical on a regular basis.
The key to having a dog or cat that allows you to trim their nails is start early and practice regularly. You can’t wait until a dog is nine months old and then decide to take it someplace to get a supershort nail trim because the dog is scratching you when it jumps on you or damaging your flooring. Teach your dog not to jump or paw people. Teach your puppy to have its nails clipped frequently as a baby and practice on a regular basis as it grows up.
What if you’ve adopted an adult or adolescent animal who has never had its nails done and won’t allow you to do so? My recommendation is start out as though they were puppies: have a person help with holding and giving out treats while someone clips one or two nails and then STOP. Come back and do a few more the next day. Be very conservative with your trimming, especially rear nails, which are often worn shorter or black nails when you can’t judge how much to take off. You must build that level of trust in order to successfully teach nail trimming. And if your new dog gives you indications this is not something they are comfortable having you do–or you yourself are not comfortable attempting a nail trim–seek professional help. But be your dog’s advocate. Tell whoever it may be that your goal is teaching a happy nail trim–NOT forcing your dog into submission to “get the job done”. That may work once… but never again.
I train all my dogs to have their nails done as puppies. I train them to trust that whatever I do, good things will follow–including cleaning ears, opening their mouths, trading one toy for another, standing for examination, etc.
I used to have one of my dogs professionally groomed. Every time I dropped him off at the groomers, I made a point of telling them not to do his nails; I do them myself.
I forgot ONE TIME to mention this at drop off. When I came to pick my dog up, the groomer met me at the door. “We don’t normally do his nails, do we?”
“Oh no,” I said. “I take care of those.”
She made a face. “I didn’t think so. We tried, and he wasn’t very good about it, so we quit.”
I didn’t think much about it at the time. A few weeks later, when I went to trim his nails, he whined and pulled his feet away and was generally uncooperative, but I eventually got them done. I was probably sterner than I should have been, not recognizing his anxiety or why he was behaving like that but it didn’t dawn on me what was going on, in part because no one was holding him for the procedure. I didn’t think too much about it until a month later when he had to be sedated for a biopsy. When the assistant put her arms around him in the typical position to restrain for an injection–similar to the position when someone holds for a nail trim–he screamed like he was being boiled alive in oil. If ever a dog had a PTSD flashback, that was what it would look like. His eyes dilated to black holes and his gums went white. He clearly didn’t recognize me or anyone working with him. We couldn’t calm him down until we let him go. It was a horrible thing to witness. Worse to know that I’d somehow allowed this to happen to him without even realizing it.
It was only then I connected the dots. That “attempt” to clip his nails had to have been a bad one. I had to retrain him from the ground up to accept being held for various procedures and the only reason it worked is because the groundwork for trust had already been laid in the first place. We just had to uncover it again, slowly, with lots of love and patience. As it was, the rest of his life, I had to be present for any sort of procedure that required his being held. He wouldn’t let anyone else do it.
If the trust isn’t there to start, then you may never be able to undo a bad nail trimming experience. For some reason, this seems to apply more to nail trimming than almost any other medical procedure we perform on animals. Perhaps it is because animals are instinctively foot-protective. Perhaps it is because a broken nail is very painful. I think a large part of it is because many people do not lay the proper groundwork for this procedure and then don’t understand what went wrong when your pet won’t allow it. You may not have been the one to violate your pet’s trust in the first place. But trust is the foundation for successful nail clipping.
I don’t know about you, but I’m guilty of not cleaning my pets’ bowls as frequently as I should. I recently read an article in the Your Dog Newsletter from Tufts University that said pet dishes contained the ninth highest levels of bacteria in our homes–even higher in some cases than toilet bowls.
Perhaps for many of us, this doesn’t seem to be an issue. Our pets are healthy, and we ourselves show no signs of illness. But many households contain immunocompromised individuals (at least 2.7 per 100 people). Pregnant women and children under five years of age are also at higher risk for developing serious illness when exposed to certain food-borne bacteria. Hardly a day goes by when we don’t hear of a pet food recall due to salmonella or listeria. Good pet food handling habits become even more important if you feed a raw diet to your pets, as the risks of exposure to such bacteria is even higher.
A study in the Plos One Journal examined the habits of pet owners regarding the storage and distribution of food, and discovered most people did not wash their hands before handling their pet’s food. One in five participants reported washing their pet’s dishes only once a week. Many said they didn’t wash their pet’s bowls more than once every three months–if ever.
As I said before, I’m guilty of practicing less than perfect pet food hygiene, even though there are some parts of the FDA guidelines I know and recommend.
But after doing a little research to write this post, I realize I need to do a better job. The FDA guidelines are pretty basic:
Wash your hands before handling your pet’s food (at least 20 seconds with soap and water). If you sing “Happy Birthday” or recite the opening sequence of the original Star Trek series (“Space: the Final Frontier. These are the voyages of the Starship Enterprise… etc), that is the perfect length of time to wash your hands.
Use a designated utensil for scooping food (not your pet’s bowl) and wash both the scooping utensil and the bowl after EACH USE.
Throw out old, spoiled food in a manner than your pet cannot access it. Bag it and place in a trash can either outside or with a locking lid.
Food storage is also critical.
Promptly refrigerate or throw out unused or leftover canned and pouched pet food. Tightly cover refrigerated pet food with the correct-sized lid Make sure your refrigerator temperature is set to 40 F or below.
Store dry pet food in a cool and dry place. The temperature should be less than 80 F. Excess heat or moisture can cause spoilage. Keeping your pets’s food in the garage is NOT a good idea.
Store dry pet food in its original bag and keep the top of the bag tightly folded down with clips or tape.
Keep pet food in a secure location to prevent your pet from eating an entire supply at once. A locking trash can is a good option.
One of the most common mistakes I see people make is purchasing food and dumping it into plastic bins for ease of storage
Lamb based dog food in particular can mold in as little as a few weeks, so if you feed lamb, you probably should buy smaller bags to use it up more quickly. One of the most common mistakes I see people make is purchasing food and dumping it into plastic bins for ease of storage (and prevent mice from getting into it). The problem with this is that you never completely remove all the crumbs from your bin before dumping the next bag on top, increasing the risk of developing mold. It is best to keep your pet’s food in the original bag and roll the top down tightly. You can still put it in your storage bin–just keep it in the original bag.
I’ve also had clients who store their pet’s food in the garage, and high, humid temperatures in the summer can destroy the value of the food as well as promote spoilage.
So bottom line, wash your hands before and after handling your pet’s food, be sure to wash bowls and utensils daily. Take steps to store your pet’s food properly. These simple steps can help keep you and your pet safer and a lot healthier.